In the next chapter of the Scottish History series, we take a look at the Battle of Alford 1645.
During the Summer of 1644 James Graham, Marquis of Montrose waged a successful campaign in Scotland on behalf of King Charles I. The Scottish Government was controlled by Covenanters who had fought the King over his religious policy in the late 1630s but, until August 1643, had remained neutral in the English Civil War between Charles and Parliament. This changed after a sustained diplomatic effort by the Parliamentarian John Pym on the promise that Presbyterian doctrine would be introduced into England. Scottish forces crossed the border in January 1644 under the command of Alexander Leslie, Earl of Leven and played a key role at the Battle of Marston Moor (1644) which saw the Royalists in northern England decimated. That same Summer, King Charles appointed Graham as Captain General in Scotland tasked with fighting the Covenanters in their home territory and causing their withdrawal from England.
 At the start of his campaign Graham had few men and little equipment. However he exploited the widespread distrust amongst the Highlanders of a key Covenanter – Archibald Campbell, Marquis of Argyll – which ensured he assembled a fledgling force. At the Battle of Tippermuir (1 September 1644) he had captured stocks of weapons and gunpowder facilitating his assault on Aberdeen later the same month. Early in 1645 he achieved a number of victories against Covenanter forces starting with the Second Battle of Inverlochy in February 1645 where he defeated Campbell with a stunning advance over the Ben Nevis mountain range.
Following the victory at Inverlochy, Montrose marched his force along the Great Glen to Inverness and then on towards Elgin. Here his small army was augmented by 500 troops from the Gordon and Grant clans enabling him to go on the offensive again. He occupied Aberdeen and from here launched attacks on Brechin and Dundee. He attacked the latter on 4 April 1645 but, alerted to the raid, a Covenanter army under Lieutenant General William Baillie marched north from Perth. The Royalists retreated just in time – allegedly leaving the town via the East Gate as Baillie marched in via the West Gate! Major-General Sir John Hurry was sent in pursuit of Montrose with a Covenanter army but was defeated at the Battle of Auldearn on 9 May 1645. With Hurry beaten, Montrose sought to destroy Baillie’s army in order to be able to focus his efforts on taking control of the Scottish central belt.
Baillie was now commander of the sole Covenanter force in Scotland but was subject to the direction of the Committee of Estates, the governing body of Scotland. Unnerved by the success of Montrose, the Committee decided to create a second army and detached around 1,200 experienced troops from Baillie reducing his infantry by half. He was compensated with new recruits but nevertheless the experience of his force had been greatly reduced. Furthermore the new Covenanter army, which was commanded by Lord Lindsay, did not operate in partnership with Baillie. Fully aware his army was now in no position for an encounter with Montrose, Baillie spent the rest of May and much of June avoiding the Royalist General. Pursued across Moray and Aberdeenshire, Baillie successfully evaded contact.
Montrose finally caught up with Baillie on 24 June 1645 near Keith. Now more confident in his forces – and believing Montrose to be in a similarly depleted state – Baillie drew up for battle and occupied a formidable defensive position. Montrose did not take the bait and an uneasy standoff followed. On 1 July 1645 Montrose sought to dislodge him by crossing the River Don and threatened an advance south. The Royalists then occupied Gallows Hill – a particularly strong position overlooking the crossing of the River Don at the Boat of Forbes – and waited to see if the Covenanters followed. Baillie now had little choice but to pursue otherwise the Royalists would have had an unopposed march into Central Scotland.
The Battle
The Covenanter force consisted of around 2,100 men while the The Royalists had a similar 2,200.
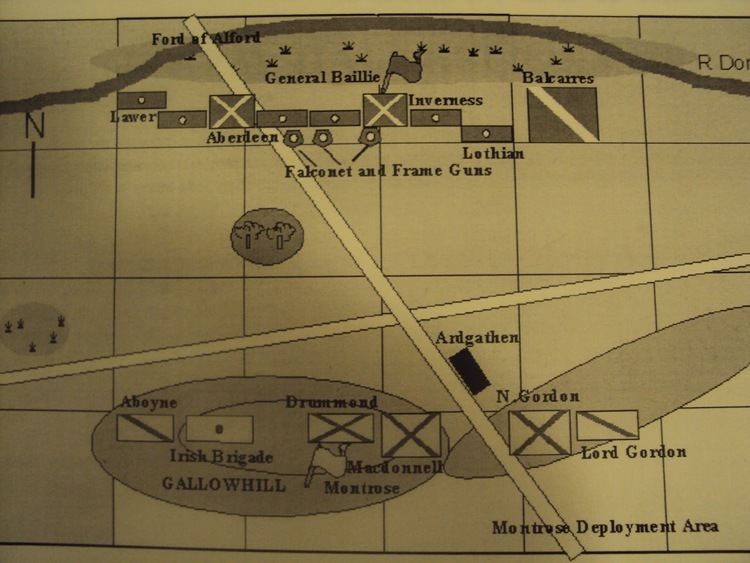
The battle was fought on the 2 July 1645. Montrose positioned the bulk of his forces on the western slope of Gallows Hill to conceal them from Baillie but whether this encouraged the Covenanter General to attack or not is unknown. Furthermore it is unclear whether Baillie actually intended to commit to battle or was simply planning to flank round Montrose’s position to bar his advance south. Some authors suggest Montrose’s deployment had tricked Baillie into thinking the Royalists were departing and it is also possible that Baillie was pressured into battle by Balcarres who was not only his cavalry commander but also a member of the Committee of Estates.
Montrose’s forces were deployed on Gallows Hill with the cavalry on the flanks and the infantry in the centre including a small reserve to the rear under Lord Napier. Given the limited numbers of mounted troops available to the Royalists, the cavalry wings were augmented with additional infantry. On the right the troops of Laghtnan supported Lord Gordon and on the left Aboyne’s horse was supported by an Irish Detachment
Montrose’s position gave him a clear view of the river crossings at Bridge of Forbes (immediately to the north of Gallows Hill) and Montgarrie. Given the dominant Royalist position over the former, it can be presumed that Baillie opted to use the crossing Montgarrie although the first map of the region, dated from the eighteenth century, does not show a major road on this route. The first units to cross the River Don were the cavalry under Lord Balcarres.
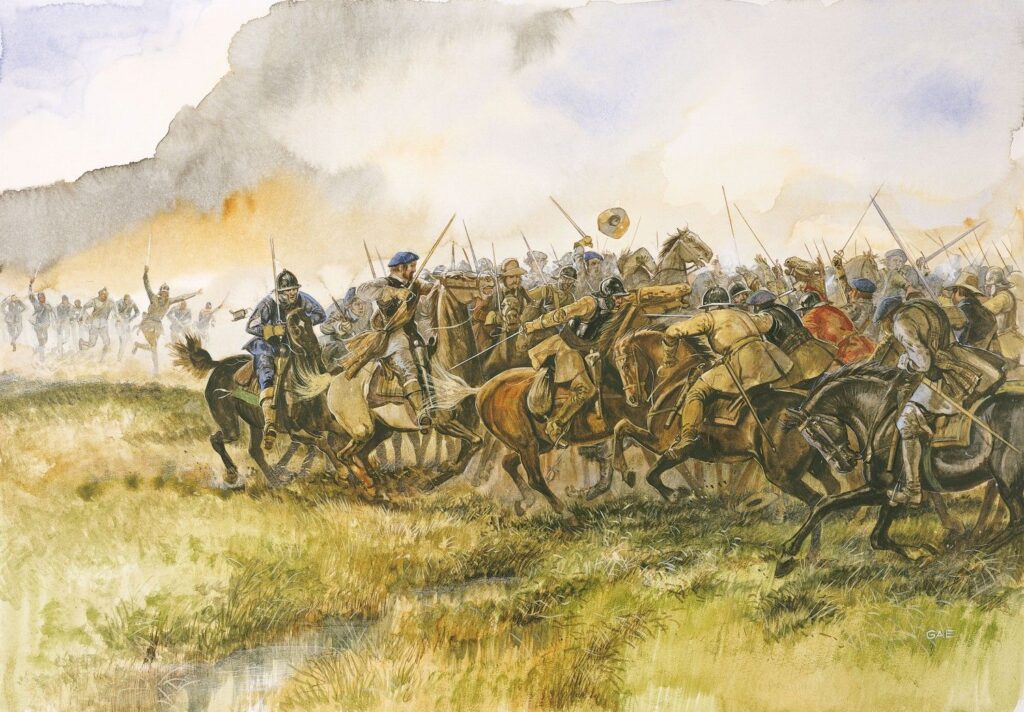
 Lord Balcarres found himself opposite the Royalist cavalry of Lord Gordon who charged against him. However, Balcarres’ men were veterans of the war in England with many having fought at Marston Moor. They held against the Royalist charge, presumably aided by their superior numbers, and repulsed Lord Gordon.
Having been initially driven back, the Royalist right re-grouped and launched a combined assault with their supporting infantry detachment under Laghtnan. This coordinated attack broke Balcarres’ force who retreated.
If previously uncommitted to battle, Baillie now had little choice but to continue the engagement. His second cavalry detachment, under Sir James Halkett, advanced and was attacked by the Royalist left under Lord Aboyne. The Covenanter force was broken and fled the battlefield.
Once the Covenanter infantry had crossed the River Don, Baillie extended the line to ensure he was not outflanked. The net effect was his infantry was just three ranks deep vice six for the Royalists. Sensing their weakness Montrose sent his infantry forward using a Highland charge – a full speed dash towards the enemy line, discharging weapons at short range and then closing into a melee with traditional weapons. Whilst experienced soldiers may have held against this onslaught, the raw recruits of Baillie’s force succumbed. The Covenanters were pushed back towards the crossing at Montgarrie.
As the Covenanter infantry buckled under the pressure of the frontal assault a portion of the Royalist cavalry, under Lord Gordon, returned to the field and joined in the attack. Gordon’s charge, in which he was shot dead allegedly by one of his own men, broke the Covenanter infantry. The troops fled the battlefield and were remorselessly pursued by the Royalist horse with many slaughtered – some accounts suggesting over one thousand men died in the retreat.


